Articles
How to Set Up a Digital Products Store in 2025 – A Step-by-Step Guide by RS Digitals
Do you want to start your own store of digital goods by 2025? This is the place to be! No matter if you’re planning to offer eBooks, templates, digital art, or other kinds of downloadable content, this guide will take you through every step of the process — from the initial idea to the moment of launch. At RS Digitals, we specialize in assisting entrepreneurs just like you in creating high-converting online stores that stand out in the modern marketplace. Grab your cup of coffee (or tea), relax, and let’s explore the steps to create the most profitable online product store step by step.
Step 1: Sign Up for a Creator Account on RS Digitals
The first step in launching your digital products store is creating a Creator Account on the RS Digitals website. It’s quick and easy!
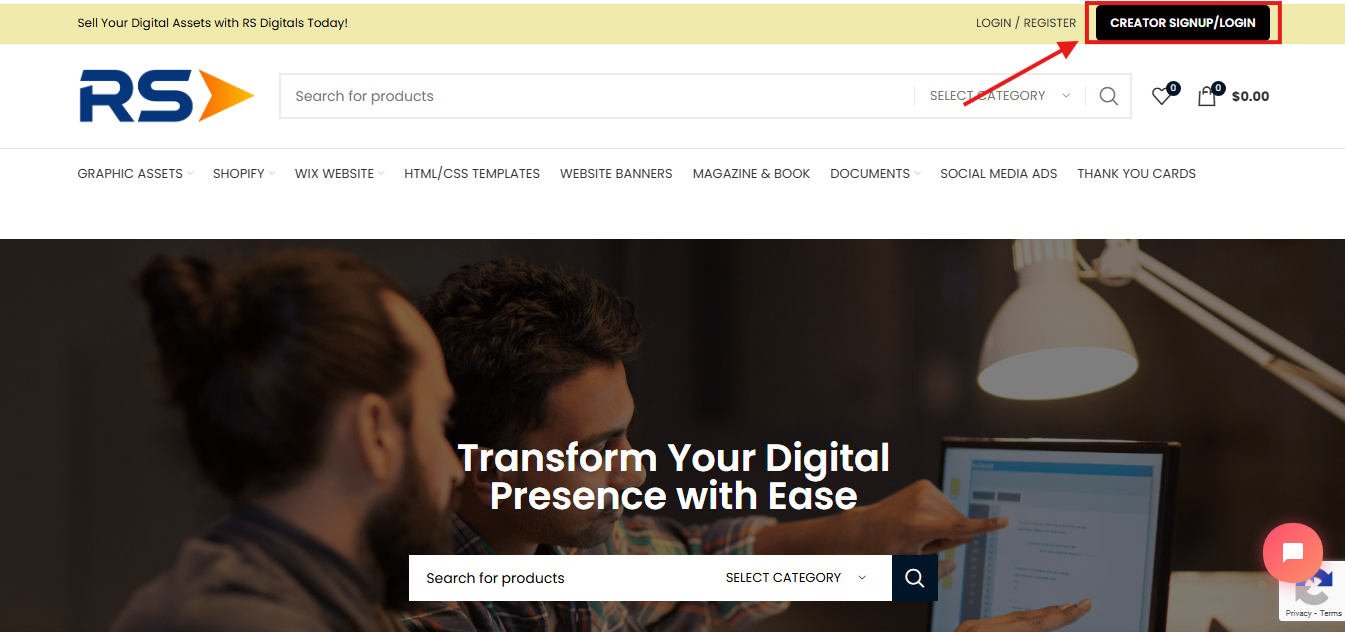
Head over to our homepage and click on the “Creator Signup/Login” button located at the top right corner. This will take you to the registration page where you can create your account and start your journey as a digital seller.
Need a little help? Check out the screenshot below for a visual walkthrough:
Step 2: Fill Out the Sign-Up Form to Create Your Account
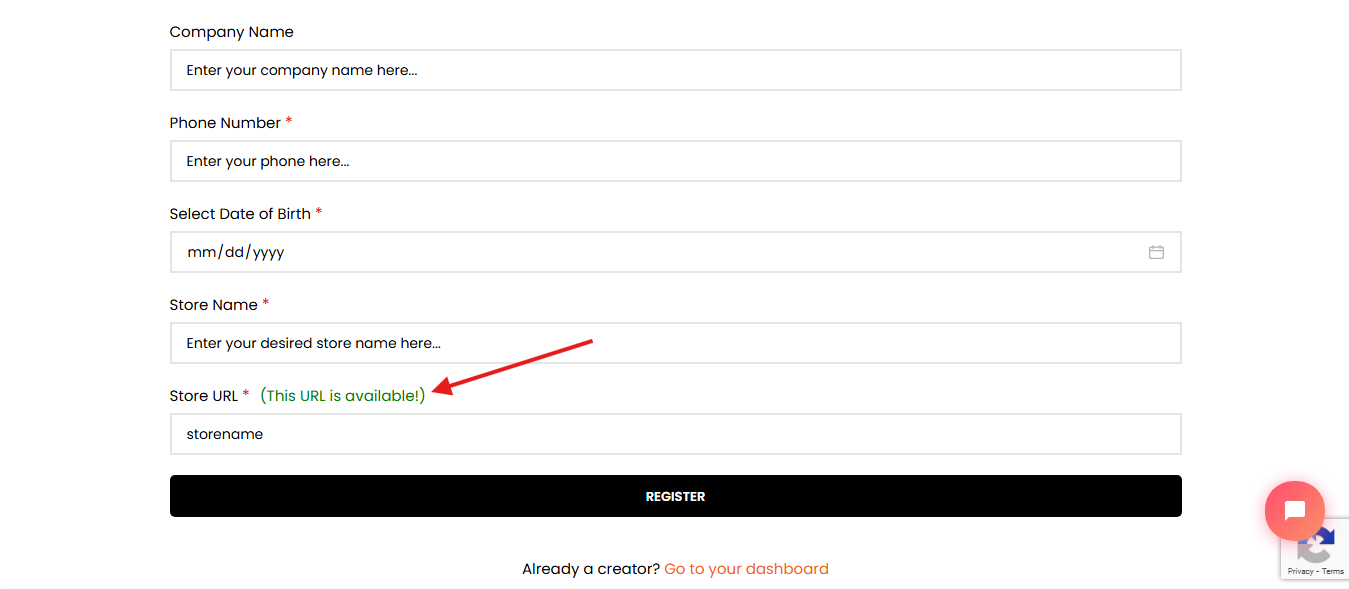
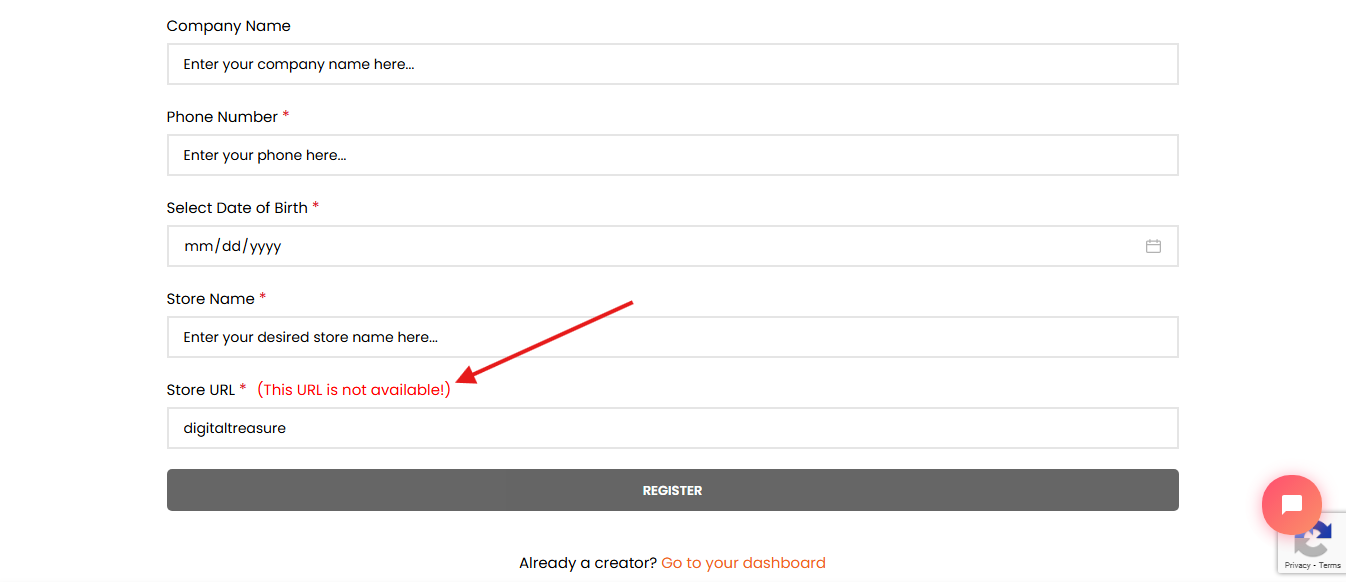
Once you click on the “Creator Signup/Login” button, you’ll be redirected to the sign-up page. Here, you’ll see a simple form that you need to fill out in order to create your RS Digitals Creator account.
The sign-up process is quick and straightforward. Below is a breakdown of each field you’ll need to complete:
- Email Address – This is a required field. Enter a valid email address that you have access to.
- Password – Choose a strong and secure password to protect your account.
- First Name – Enter your first name.
- Last Name – Add your last name.
- Company Name (optional) – If you’re representing a business, enter your company’s name. If not, you can leave this field blank.
- Phone Number – Add your phone number for contact and verification purposes.
- Date of Birth – Select your date of birth from the calendar picker.
- Store Name – Give your digital product store a unique and catchy name.
- Store URL – This is an important one! Enter a custom, unique URL for your store.
- If your chosen URL is available, you’ll see a green message saying: “The URL is available.”
- If it’s already taken, you’ll see a red message: “This URL is not available.” In that case, just tweak your store URL until you see the green confirmation.
Once all fields are filled in and your store URL is confirmed, go ahead and click the “Register” button to complete your account setup.
Check out the screenshots below to see examples of both available and unavailable store URLs:
Step 3: Wait for Account Approval and Access Your Creator Dashboard
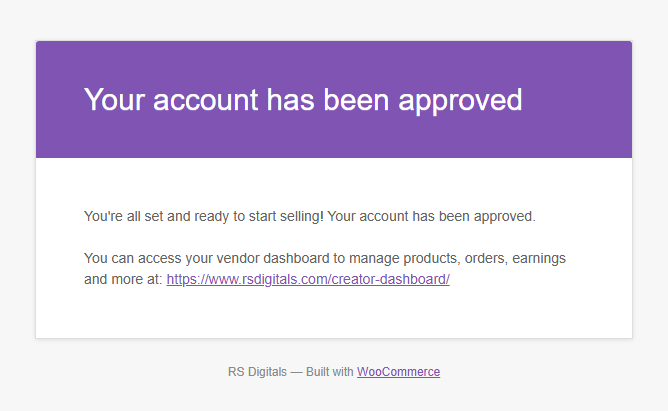
When you submit the sign-up request the application will be evaluated through the RS Digitals team. It usually is approximately 1-2 working days. When your account is accepted and you’ll be sent an acknowledgement email which includes a direct URL to the creator dashboard.
Check your email inbox (and the junk/spam folder to be safe) to see if you have received the confirmation email.
In the email you receive inside, there’s the option to sign in to your account dashboard. Once there, you can begin creating your online store.
Check out the image below for an illustration of the confirmation email you’ll get:
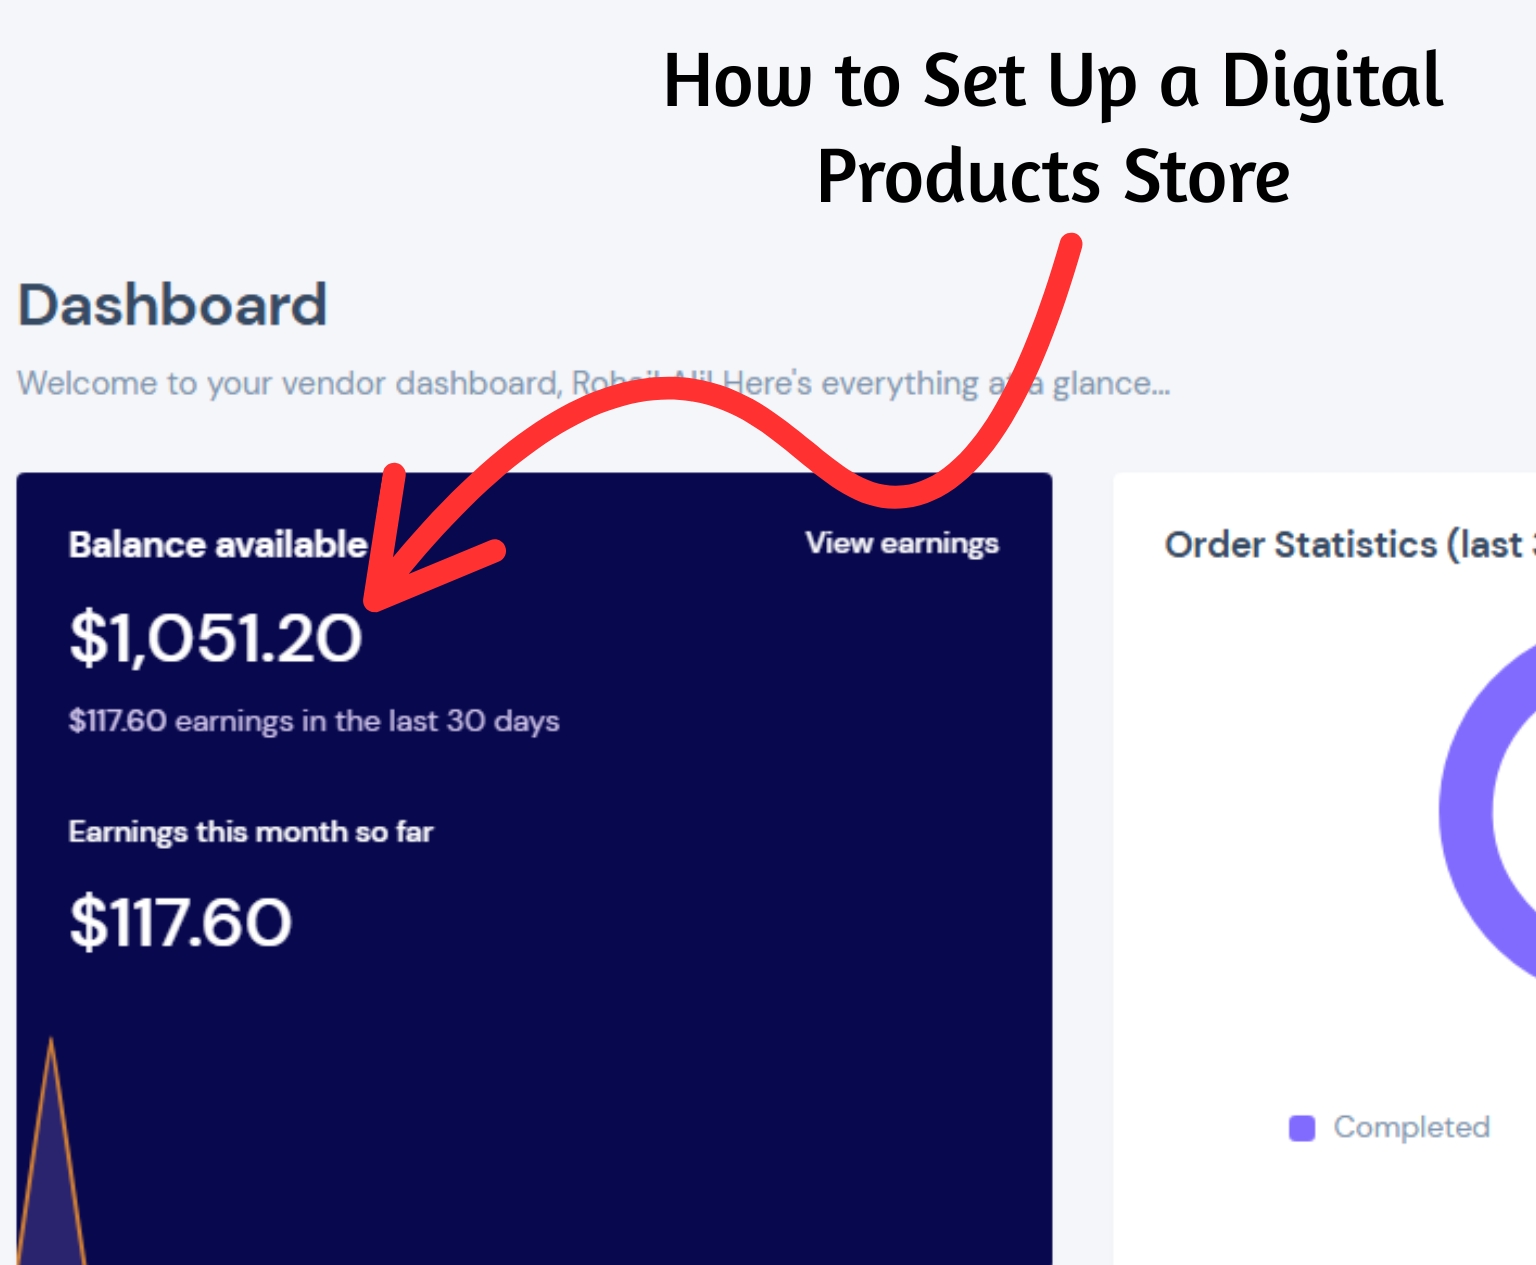
Step 4: Access Your Creator Dashboard
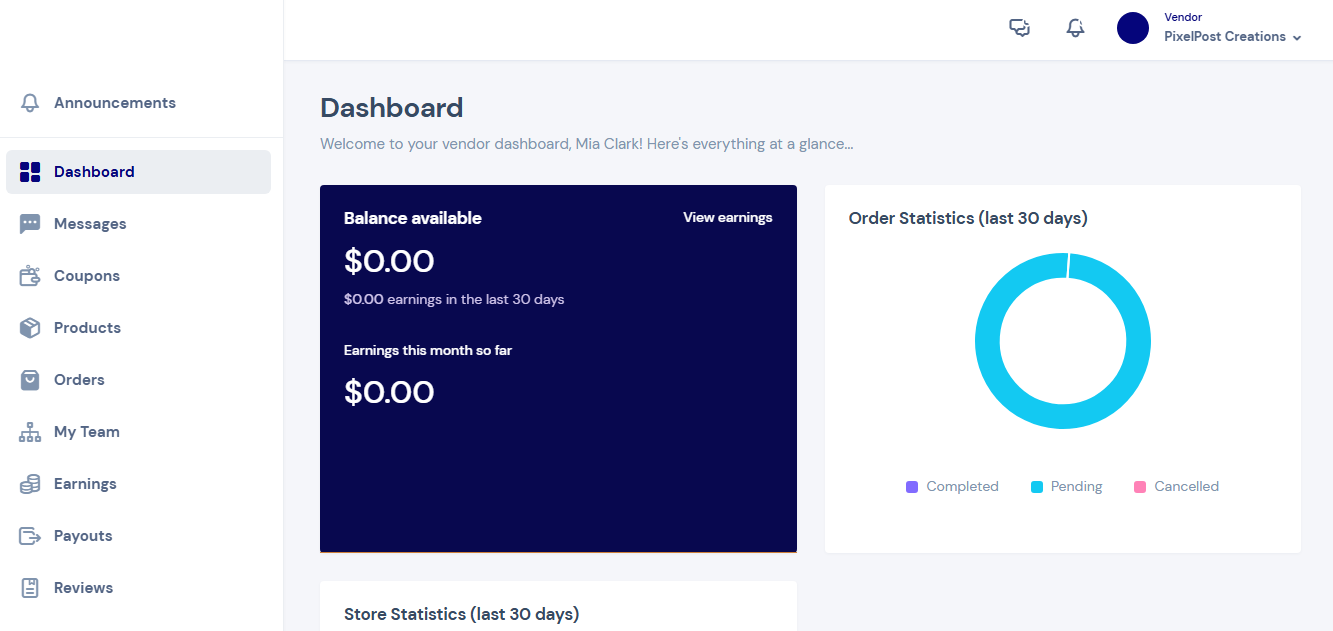
Once you receive your approval email, click on the Creator Dashboard link provided—usually something like this: https://www.rsdigitals.com/creator-dashboard/
It will direct you to the dashboard for RS Digitals Creator, and that’s where the true magic happens!
In the dashboard, you’ll discover everything you need to know about the settings and tools needed to set up and run a functional online store. From uploading your items to setting up your storefront’s design, everything is organized to allow you to set it up quickly, even when you’re just starting out.
Check out the image below to become familiar with the design of this Creator Dashboard:
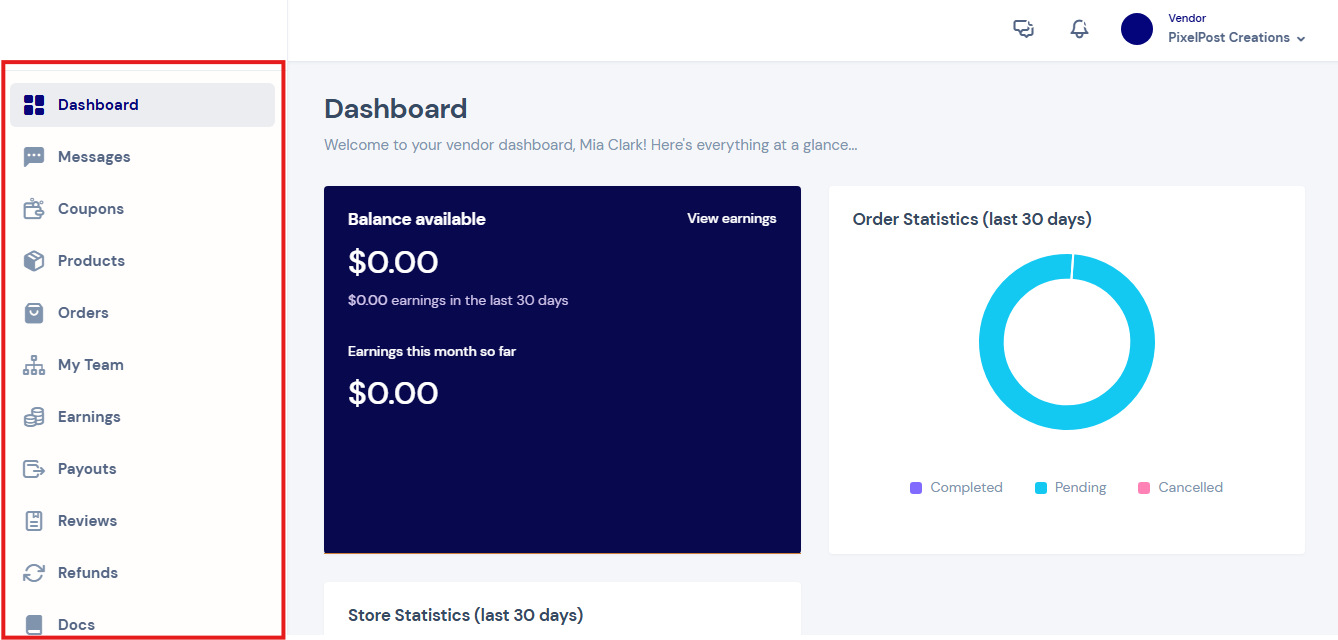
Step 5: Explore the Creator Dashboard Tabs
The RS Digitals Creator Dashboard is packed with everything you need to manage and grow your digital products store. Let’s break down each tab and what you can do with it:
- Announcement
This is the first tab on the left side of your dashboard. Here, you’ll find important updates, feature releases, and announcements directly from the RS Digitals team. - Dashboard
The main overview of your store performance. You’ll see key stats like total sales, available balance, and overall store analytics—all in one place. - Messages
This tab lets you view and respond to messages from your customers as well as communicate with RS Digitals support. - Coupons
Want to run a discount campaign? Use this tab to create and manage coupon codes to offer special deals to your customers. - Products
Here’s where you manage your digital products. You can add, edit, or remove products easily. - Orders
Track all the orders placed in your store. You can view order details, update statuses, and manage fulfillment. - My Team
Collaborating with others? Use this tab to invite team members who can help you manage products, respond to customers, and more. - Earnings
This tab shows a detailed view of your revenue—including total earnings, current month’s earnings, and the balance available for withdrawal. - Payouts
View your available payout balance and initiate withdrawals directly from this tab. - Reviews
See what your customers are saying! This section displays all customer reviews left on your products. - Refunds
If any customers request a refund, you’ll see and manage those requests here. - Docs
This tab houses all official documentation and tutorials provided by RS Digitals to guide you through store setup and features. - Subscription
Choose the plan that best suits your needs. RS Digitals currently offers four subscription tiers:
- Free Plan – Allows you to sell one digital product.
- Rising Creators – Sell up to 10 digital products with added benefits.
- Pro Creators – Upload and sell up to 30 digital products, plus enjoy premium features.
- Elite Creators – Sell unlimited products and unlock the highest level of benefits and tools.
- Settings
Customize and fine-tune your store experience here. You can:
- Update your profile
- Configure customer support preferences
- Set vacation mode
- Add store notices and policies
- Manage SEO settings
- Link your social media profiles
Each tab is designed to make managing your store easier, whether you’re just starting out or scaling up.
Final Step: You’re Ready to Launch!
As you’ve seen throughout this guide, setting up your digital product store on RS Digitals is simple, intuitive, and packed with features to help you succeed. From uploading your products to managing orders and tracking earnings, everything is built to support creators at every stage.
You can sell almost any type of digital product—from eBooks and templates to courses and graphics—except for cracked software or video templates (due to copyright and licensing concerns).
Need help along the way? No worries—our support team has your back. You can reach out anytime at info@rsdigitals.com for personalized assistance.
Final Thoughts
Whether you’re a designer, educator, developer, or creative entrepreneur, RS Digitals gives you the tools and flexibility to launch and grow your own digital product business in 2025 and beyond.
No complicated tech skills needed. No upfront costs to worry about. Just your creativity, your content, and a platform built to help you monetize your passion.
Ready to start selling?
Sign up as a Creator today and bring your digital products to life!